How to Refurbish a Futon
Is your futon looking worn, saggy, or outdated? You do not need to replace it when you can refurbish a futon yourself. With basic tools and creative effort, you transform an old piece into a custom design that looks store-bought.
This step-by-step guide covers fabric replacement, tensioning, and adding decorative details like beaded accents. You will achieve professional results on a budget in just one weekend.
Prep the Frame and Fabric
Proper preparation sets the foundation for a flawless finish before any stapling begins.
Lay Fabric Smoothly Over Frame
Drape your new upholstery fabric over the top surface and let it hang down the sides. Choose durable materials like canvas or twill for the best longevity. Pull the fabric gently into all contours to ensure full coverage without stretching yet.
Secure Edges with Temporary Pins
Use small hand sewing needles or fabric clips to anchor the fabric along the edges temporarily. Place these anchors every six to eight inches, focusing on corners and curved areas. These pins prevent shifting during tensioning and allow adjustments before permanent fastening.
Pro Tip: Work in a dust-free area with good lighting to prevent debris from getting trapped under the fabric.
Create Defined Surface Indentations
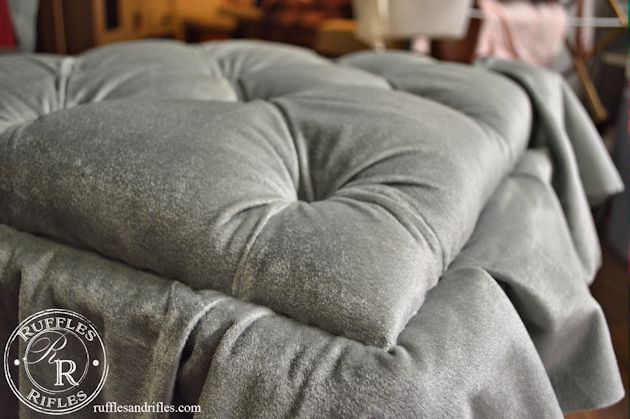
Adding indentations gives your project a tailored, tufted look similar to a high-end sofa.
Mark Eight Evenly Spaced Dimple Points
Decide on a pattern where eight indentations work well for most standard sizes. Use a fabric-safe chalk marker or removable tape to mark the spots clearly. Keep spacing symmetrical at ten to twelve inches apart for visual balance.
Stitch Deep, Clean Dimples
Thread a long needle with heavy-duty thread or waxed yarn for this step. Push the needle through the fabric from the top and pull tightly from beneath to create a neat dimple. Tie a secure knot on the underside while leaving no loose ends.
Repeat this process for all eight points to ensure the fabric stays taut. The tighter the pull, the more defined the indentation becomes. This technique prevents sagging over time rather than just adding decoration.
Watch For: Fabric puckering. Reposition the stitch if the material bunches instead of dimpling smoothly.
Tighten and Staple the Fabric
Flip the futon over to begin securing the fabric permanently to the wooden frame.
Remove Old Staples Safely
Use a hammer or flathead screwdriver to pry out any protruding staples from previous use. Wear safety glasses because metal fragments can fly during removal. A clean and flush surface ensures new staples hold securely.
Staple with Consistent Tension
Start at the center of one long side and pull the fabric taut without stretching it thin. Fire a staple using a staple gun with adjustable tension and move outward in both directions.
- Alternate sides to maintain even tension across the surface.
- Repeat on the opposite side before doing the two short ends.
- Fold corner fabric neatly like wrapping a present before stapling for a crisp finish.
Key Rule: Tug, staple, and repeat without skipping the pulling step between staples.
Hammer Staples Flush
Tap staples with a hammer after each row to seat them fully. This prevents snagged clothes or accidental scratches during daily use. Check for loose edges and add extra staples if the fabric lifts when pressed.
Trim Excess and Add Interfacing
A professional finish requires hiding raw edges and reinforcing weak points underneath.
Cut Away Extra Fabric
Trim excess fabric from the underside once fully stapled, leaving about one inch beyond the staples. Avoid cutting too close since you may need extra material if re-tensioning is required later.
Apply Bottom Interfacing
Interfacing is a stiff backing fabric that protects the underside and adds structure. Cut it to match the futon shape and lay it over the stapled area smoothly. Tuck the interfacing neatly around corners and secure it with fabric glue or light stapling.
This step extends the life of your refurbishment by shielding the fabric from abrasion. Without interfacing, staples can wear through fabric over time and lead to unraveling.
Install Legs and Finish Sides
Stability and full coverage complete the structural upgrade of your furniture piece.
Attach Support Legs First
Install removable legs now before finishing side edges to stabilize the frame. Tighten screws securely into pre-drilled holes because wobbly legs compromise the entire piece. This makes handling the futon much easier during the final steps.
Wrap and Secure Side Panels
Pull the remaining side fabric down and staple it using the same tugging technique. Use L-brackets or corner braces underneath for added strength on thicker frames. Run your hand along the perimeter to ensure no staples are exposed.
Add Beaded Accent Details

Turn functional indentations into stylish focal points with simple decorations.
Repurpose Old Jewelry Beads
Use beads from broken necklaces or thrifted strands for this creative step. Thread a heavy-duty nylon line through the same needle holes used for dimples. Pass the thread through the bead and pull it tight from the backside before knotting securely.
Design Ideas:
* Use matching beads for an elegant look.
* Mix colors for a playful vibe.
* Alternate shapes like round, oval, or faceted styles.
The beads catch light and add texture to transform utilitarian tufting into custom art. Test bead weight first because heavy beads may sag the fabric over time.
Final Inspection and Position Test
Test form and function before declaring your project complete.
Flip to Chair Position
Open the futon into its seated mode to observe fabric behavior during movement. Ensure there are no wrinkles, bunching, or interference from added beads. Press down on the seat to confirm it feels firm and supported.
Check Backside Quality
Flip it again to inspect the underside for any missed details. Verify that all staples are flush and interfacing is fully secured. Trim any loose threads and ensure no sharp edges or protrusions remain.
Why This Refurbishment Method Works

This approach combines smart technique with sustainable design principles.
Tension Prevents Long-Term Sagging
Continuous pulling during stapling combined with stitched dimples keeps fabric taut. Unlike quick fixes that droop in months, this method locks in tightness for years.
Interfacing Boosts Durability
Most DIYers skip interfacing, but it separates amateur work from professional results. Interfacing reduces wear, blocks dirt, and cushions the frame against friction.
Upcycling Lowers Cost and Waste
Using old beads or leftover fabric turns trash into treasure effectively. One broken necklace becomes a signature detail in your eco-friendly design.
Secure Fastening Eliminates Hazards
Fully seated staples mean no snagged socks or scraped hands for your family. Safety and style go hand-in-hand with proper installation.
Essential Tools and Materials List
Gather everything before starting your project to ensure smooth progress.
Must-Have Supplies
- Upholstery fabric (1.5x futon size)
- Heavy-duty thread or waxed yarn
- Staple gun with 1/4″ staples
- Hammer
- Fabric scissors
- Measuring tape
- Chalk marker or tape
- Interfacing fabric (non-woven type)
- Beads (repurposed or new)
- Nylon thread for beading
Optional But Helpful
- Fabric glue
- L-brackets for frame reinforcement
- Knee pads for comfort
- Safety glasses
Time Estimate: 6–8 hours over one weekend
Difficulty Level: Moderate (suitable for beginners with patience)
Common Mistakes to Avoid
Even small errors can ruin a polished look if you are not careful.
Skipping the Tension Check
Rushing the tug and staple process leads to loose fabric quickly. Always pull firmly before each staple to maintain tightness.
Cutting Fabric Too Small
Always leave at least three extra inches on all sides during initial layout. It is easier to trim excess than to patch gaps later.
Forgetting Symmetry in Dimples
Misaligned indentations look sloppy and unprofessional. Use a ruler or grid template to space them evenly.
Exposing Sharp Staples
Never leave staples sticking out proud of the wood surface. A quick tap with a hammer ensures safety and neatness.
Maintenance Tips After Refurbishing
Keep your updated futon looking fresh with simple care routines.
Vacuum Weekly
Use a soft brush attachment to remove dust and debris from the surface. Pay attention to crevices where dirt accumulates.
Spot Clean Stains Immediately
Blot spills with a dry cloth and use mild soap and water for cleaning. Avoid soaking the fabric to prevent damage.
Rotate Beads Periodically
Rotate bead positions if they show uneven wear over time. Replace selective beads to maintain the aesthetic appeal.
Re-Tighten Every 6 Months
Fabric may relax over time, so flip and check staples regularly. Re-tension if needed to maintain the professional look.
When to Consider Full Replacement
Refurbishing works wonders, but not all futons can be saved effectively.
Replace If:
- Frame is cracked or wobbly beyond repair
- Hinges are rusted or broken completely
- Mattress inside is moldy or collapsed
- Wood will not hold staples anymore
Consider disassembling and reusing only the metal parts or legs in these cases.
Frequently Asked Questions About Refurbishing a Futon
Can I refurbish a futon without sewing?
Yes, you can rely primarily on a staple gun and fabric glue for most steps. However, stitching dimples adds structural tension that stapling alone cannot achieve.
What type of fabric is best for a futon makeover?
Choose durable, tightly woven fabrics like canvas, twill, or outdoor-grade material. These materials withstand daily use and tensioning better than thin cottons.
How long does it take to refurbish a futon?
Most projects take 6 to 8 hours to complete over a single weekend. Preparation and drying time for adhesives may extend this slightly.
Do I need special tools to add bead details?
No, you only need a long needle, heavy-duty nylon thread, and the beads themselves. Repurposed jewelry works perfectly for this decorative step.
Why is my fabric sagging after refurbishment?
Sagging usually occurs from insufficient tension during stapling or skipping the dimple stitching step. Ensure you pull tightly before every staple and create defined indentations.
Key Takeaways for Your Futon Refurbishment Project
Refurbishing a futon creates something uniquely yours while saving money and reducing waste. You have learned to replace fabric, create professional tufting, and reinforce weak points effectively.
Every detail from crisp tension to upcycled beads tells a story of care and creativity. Give your tired futon a second life with this DIY design revolution.